
Make a Vegetable Platter for your next special occasion gathering.
- May 12, 2023
- 4 min read

The months of May and June are filled with lots of special occasions—graduation parties, weddings, bridal showers, and family barbecues. Fruit and veggie trays are always popular items for buffets. With rising food costs, you may not want to spend the extra dollars to purchase a vegetable tray from your local supermarket. It’s easier than you might imagine to assemble attractive veggie platters, and it’s lots of fun. When I first started making veggie trays, I must admit I was uptight about arranging the veggies and adding the finishing touches. One of our experienced deli clerks advised, “Just relax and have fun. When it’s time to add the garnish, let your creative juices flow. Do something funky.” The hardest part about assembling veggie trays is estimating the necessary quantities. Following is a guide on how many servings per pound a specific vegetable will yield. You can customize your veggie platter by using any combination of vegetables you prefer. What’s most important is selecting fresh, firm, unblemished vegetables. For example, avoid cauliflower that has brown or black spots. Mushrooms should have closed caps and not be wrinkled, spongy, or spotted.
Decide on the vegetables you will use and then calculate how many pieces of each vegetable you will need. Allow 4 to 8 pieces per person. If you are using the crudités as a relish, plan on 4 pieces per person. If it’s used as a salad, increase that number to 8 per person.
What is most important when serving crudités is clean, crisp vegetables. Wash and cut the vegetables into the desired shapes and sizes. I like cutting veggies like cucumbers and zucchini into strips rather than rounds because strips are easier to dip.
Blanch asparagus, broccoli, and pea pods for a brighter color. To blanch, plunge vegetables into a saucepan of boiling water for no more than 2 minutes. Remove the vegetables and immediately plunge them into ice water to retard cooking. Drain and pat the vegetables dry with paper towels.
A hint for celery: My mother taught me to de-string celery by using a small paring knife and lifting the strings from the celery ends by pulling them up and off. Soak celery and carrot sticks in ice water for 30 minutes to make them extra crispy.
Soak Jerusalem artichokes in a solution of 1 tablespoon lemon juice and 1 quart water for about 10 minutes to prevent darkening. Drain and pat dry with paper towels.
Delis typically line platters with leaf lettuce or romaine before arranging the vegetables on top. I like using kale to separate the different vegetables into sections. Once your veggies are prepped, line your tray with lettuce and arrange your veggies in an eye-appealing manner. Use curly kale to separate your veggies if you so desire. With today’s rising food costs, you may not want to spend extra dollars for this finishing touch.
Cherry tomatoes, olives, and cherry peppers make fun garnishes. Try hollowing out a green, red, or yellow bell pepper to use as containers for serving dip. Using both a green and a red bell pepper makes a nice color contrast.
Once your tray is assembled, cover it with plastic wrap and refrigerate it until you are ready to serve it.
If you want to transport your veggie platter to another location, you can purchase deli platters with fitted covers at good party stores. If you will be serving it at home, use an attractive or funky platter you already have. Wooden boards are not only good for charcuterie but make charming serving platters for veggies as well.
I like serving blue cheese dressing with my veggie platters; my recipe follows. Hummus is also popular, and there are several delicious brands available at the supermarket. Jicama is a fun veggie to include in a vegetable platter. It is a less familiar vegetable so I have included tips on how to select the very best jicama as well as tips on how to remove its papery skin.

Carol Ann’s Blue Cheese Dressing Makes about 3 cups
1 cup mayonnaise 1 cup sour cream 1 cup blue cheese, crumbled ¼ cup + 2 tablespoons white vinegar 2 teaspoons minced garlic 1 teaspoon salt ½ teaspoon large grind black pepper In a medium bowl, combine mayonnaise, sour cream, blue cheese, vinegar, garlic, salt, and pepper and whisk until blended. Cover with plastic wrap and refrigerate until time to serve.
Tips on selecting jicama: Select medium-sized jicamas with smooth, unblemished skin. Scratch the skin with your nail. It should be thin, and the flesh underneath should be juicy. Do not buy jicamas with cracks or bruises or ones that are shriveled or sticky.
Tips on storing jicama: When stored uncovered in a cool, dry place, jicama will keep up to 3 weeks. Once you cut into it, it will keep 1 week when refrigerated and placed in a reusable, paper, or plastic bag or when wrapped in plastic.
Tips on using jicama: A vegetable peeler may not work well on jicama. Using a sharp knife, slice one end of the jicama off to create a flat base. Run the knife under the skin trying to keep as much of the flesh as possible. Because the skin is quite papery, you can make a 1-inch slice into the skin and pull the skin off. Use a vegetable peeler or paring knife to remove any remaining skin.
Carol Ann
Carol Ann Kates is the award-winning author of cookbook, Secret Recipes from the Corner Market and Grocery Shopping Secrets. She’s an expert in how to shop, select, and store produce for maximizing home cooking outcomes and minimizing time and money spent. As a former supermarket and deli operator, Carol Ann shares grocery-insider wisdom—the same expertise you used to receive when patronizing a mom-and-pop establishment. Contact her at CarolAnn@CarolAnnKates.com and explore her website, www.CarolAnnKates.com.
Copyright 2023 All Rights Reserved Carol Ann Kates
1
Searing the Beef
Sear beef fillets on high heat for 2 minutes per side to form a golden crust. Let it cool before proceeding to keep the beef tender.
1
Searing the Beef
Sear beef fillets on high heat for 2 minutes per side to form a golden crust. Let it cool before proceeding to keep the beef tender.
1
Searing the Beef
Sear beef fillets on high heat for 2 minutes per side to form a golden crust. Let it cool before proceeding to keep the beef tender.
1
Searing the Beef
Sear beef fillets on high heat for 2 minutes per side to form a golden crust. Let it cool before proceeding to keep the beef tender.
Notes


1
Season the good fresh beef fillets with salt and black pepper. Heat olive oil in a pan over high heat and sear the fillets for 2 minutes per side until it fully browned. Remove the beef from the pan and brush with a thin layer of mustard. Let it cool.
1
Season the good fresh beef fillets with salt and black pepper. Heat olive oil in a pan over high heat and sear the fillets for 2 minutes per side until it fully browned. Remove the beef from the pan and brush with a thin layer of mustard. Let it cool.
1
Season the good fresh beef fillets with salt and black pepper. Heat olive oil in a pan over high heat and sear the fillets for 2 minutes per side until it fully browned. Remove the beef from the pan and brush with a thin layer of mustard. Let it cool.
1
Season the good fresh beef fillets with salt and black pepper. Heat olive oil in a pan over high heat and sear the fillets for 2 minutes per side until it fully browned. Remove the beef from the pan and brush with a thin layer of mustard. Let it cool.
Instructions
Quality Fresh 2 beef fillets ( approximately 14 ounces each )
Quality Fresh 2 beef fillets ( approximately 14 ounces each )
Quality Fresh 2 beef fillets ( approximately 14 ounces each )
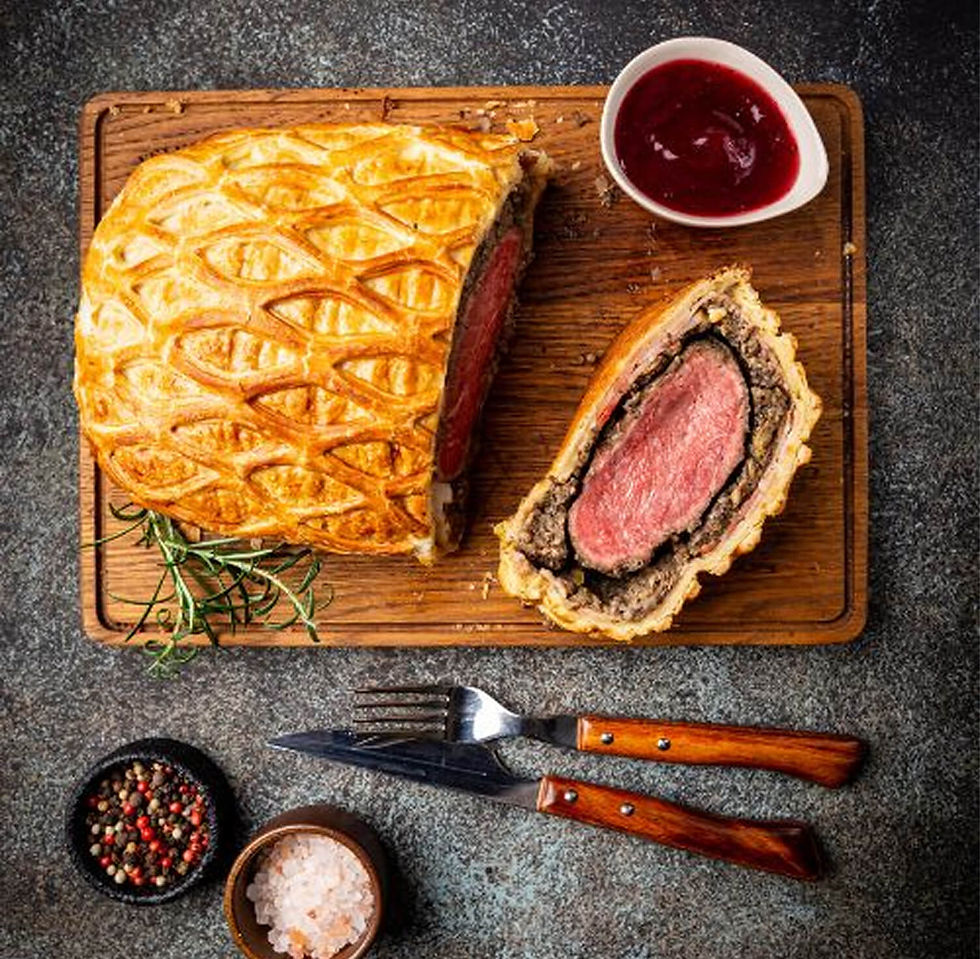
Beef Wellington
Beef Wellington
Fusion Wizard - Rooftop Eatery in Tokyo
Author Name
%20(1).jpg)
Beef Wellington is a luxurious dish featuring tender beef fillet coated with a flavorful mushroom duxelles and wrapped in a golden, flaky puff pastry. Perfect for special occasions, this recipe combines rich flavors and impressive presentation, making it the ultimate centerpiece for any celebration.
Servings :
4 Servings
Calories:
813 calories / Serve
Prep Time
30 mins
Prep Time
30 mins
Prep Time
30 mins
Prep Time
30 mins


Comments