
It’s a game changer! This year serve your layered dip in individual tumblers.
- ckcallighan20209
- Feb 9, 2024
- 3 min read

My family loves my layered dip so much that they don’t want anyone to get more than their fair share. They watch vigilantly to make sure no one is hogging the dip. So, this year I am serving my layered dip in individual tumblers. One for each person. That way we can focus on the game—the Chiefs versus the 49ers—not on whose eating what.
Carol Ann’s Layered Mexican Dip
Serves 12
1 package (8-ounces) cream cheese, softened
2 cups sour cream
1 package (1/4-ounce) Old El Paso® Taco Seasoning Mix
3 ripe avocados
2 tablespoons lemon juice
Salt to taste
Minced garlic to taste
1 can (16-ounces) refried beans
Your favorite salsa
2 cups shredded Cheddar or Colby cheese
1 to 2 tomatoes, diced
6 green onions, chopped
or
1 cup red onion, chopped
1 can (2 ¼-ounces) sliced black olives
Your favorite tortilla chips
In a large bowl, blend cream cheese, sour cream, and taco seasoning mix until evenly mixed and set aside. If you have trouble getting a nice consistency, you can use your mixer but do not blend for too long.
Mash avocados until slightly lumpy, add lemon juice, salt, and garlic and blend thoroughly.
Use 12 glass or plastic tumblers or wide-mouthed wine glasses to layer ingredients. Divide ingredients equally among the containers, layering refried beans, salsa, mashed avocado, and the cream cheese mixture.
Garnish as desired with cheese, tomatoes, green or red onion, and black olives. Cover with plastic wrap and store in the refrigerator until ready to serve.
Serve with your favorite tortilla chips.
Tips on selecting tomatoes: Select firm and plump tomatoes. Do not buy pale, spotted, or mushy specimens. Avoid tomatoes with blemishes or cracks. Color is a good indicator of freshness. Pick brightly colored tomatoes. My father taught me to shop with my nose. Smell the stem end of the tomato. If it’s ripe, it will smell like a tomato. Ripe tomatoes should give slightly when pressed.
Tips on storing tomatoes: Treat tomatoes gently. Place only ripened tomatoes in the refrigerator. Cool temperatures slow the ripening process. To ripen, place tomatoes at room temperature stem side down. To hasten the ripening process, place tomatoes in a paper bag and keep at room temperature.
Tips for selecting avocados: If you want to use your avocado immediately, select one that yields to gentle pressure. If you are shopping ahead and plan to use the avocado in a few days, pick one that is firm to the touch. Don’t buy avocados that are bright green and feel rock-hard. They are difficult to ripen. Also, don’t buy this vegetable if it is sunken, shriveled, or feels mushy.
Tips for storing avocados: Avocados should be stored at room temperature until they are ready to eat. To speed up the ripening process, place them in a paper bag with an apple. Once ripe, avocados will keep up to 2 days in the refrigerator. If you use only half of an avocado, leave the pit in, brush the flesh with lemon juice, wrap tightly with plastic wrap, and refrigerate.
Carol Ann

Carol Ann Kates is the award-winning author of cookbook, Secret Recipes from the Corner Market and Grocery Shopping Secrets. She’s an expert in how to shop, select, and store produce for maximizing home cooking outcomes and minimizing time and money spent. As a former supermarket and deli operator, Carol Ann shares grocery-insider wisdom—the same expertise you used to receive when patronizing a mom-and-pop establishment. Contact her at CarolAnn@CarolAnnKates.com and explore her website, www.CarolAnnKates.com.
Copyright 2024 All Rights Reserved Carol Ann Kates
1
Searing the Beef
Sear beef fillets on high heat for 2 minutes per side to form a golden crust. Let it cool before proceeding to keep the beef tender.
1
Searing the Beef
Sear beef fillets on high heat for 2 minutes per side to form a golden crust. Let it cool before proceeding to keep the beef tender.
1
Searing the Beef
Sear beef fillets on high heat for 2 minutes per side to form a golden crust. Let it cool before proceeding to keep the beef tender.
1
Searing the Beef
Sear beef fillets on high heat for 2 minutes per side to form a golden crust. Let it cool before proceeding to keep the beef tender.
Notes


1
Season the good fresh beef fillets with salt and black pepper. Heat olive oil in a pan over high heat and sear the fillets for 2 minutes per side until it fully browned. Remove the beef from the pan and brush with a thin layer of mustard. Let it cool.
1
Season the good fresh beef fillets with salt and black pepper. Heat olive oil in a pan over high heat and sear the fillets for 2 minutes per side until it fully browned. Remove the beef from the pan and brush with a thin layer of mustard. Let it cool.
1
Season the good fresh beef fillets with salt and black pepper. Heat olive oil in a pan over high heat and sear the fillets for 2 minutes per side until it fully browned. Remove the beef from the pan and brush with a thin layer of mustard. Let it cool.
1
Season the good fresh beef fillets with salt and black pepper. Heat olive oil in a pan over high heat and sear the fillets for 2 minutes per side until it fully browned. Remove the beef from the pan and brush with a thin layer of mustard. Let it cool.
Instructions
Quality Fresh 2 beef fillets ( approximately 14 ounces each )
Quality Fresh 2 beef fillets ( approximately 14 ounces each )
Quality Fresh 2 beef fillets ( approximately 14 ounces each )
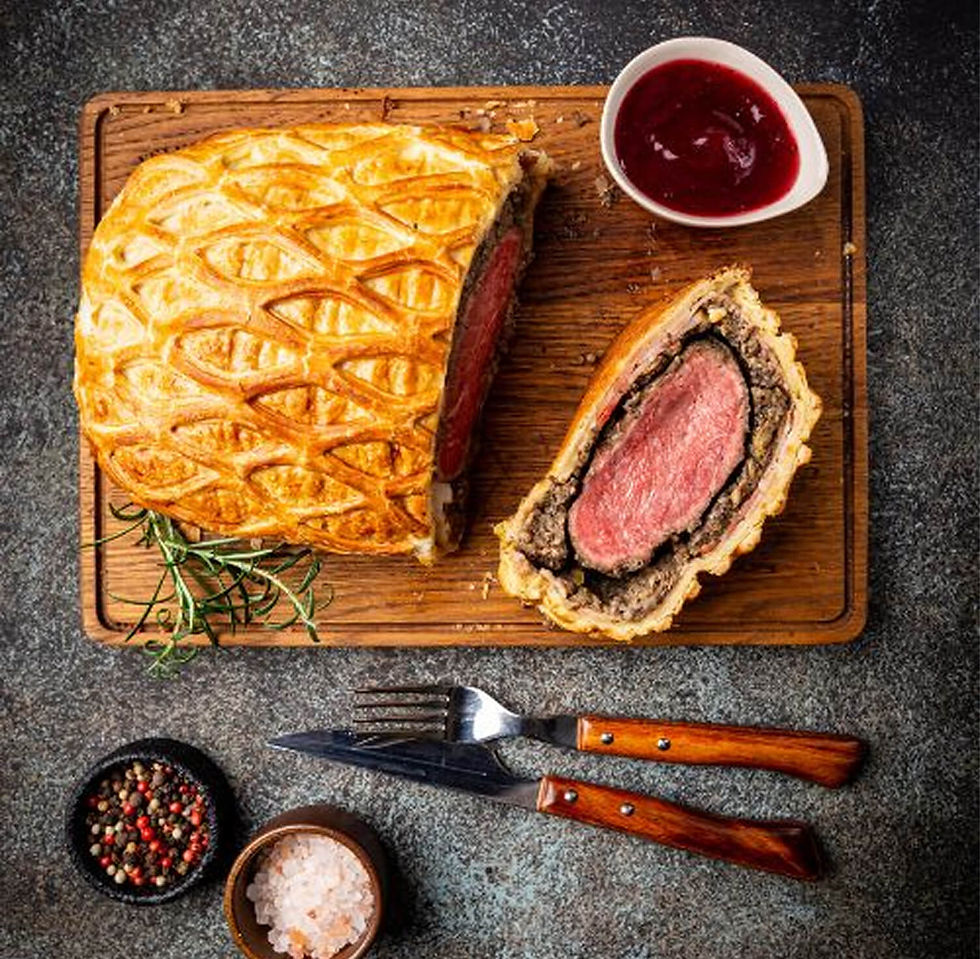
Beef Wellington
Beef Wellington
Fusion Wizard - Rooftop Eatery in Tokyo
Author Name
%20(1).jpg)
Beef Wellington is a luxurious dish featuring tender beef fillet coated with a flavorful mushroom duxelles and wrapped in a golden, flaky puff pastry. Perfect for special occasions, this recipe combines rich flavors and impressive presentation, making it the ultimate centerpiece for any celebration.
Servings :
4 Servings
Calories:
813 calories / Serve
Prep Time
30 mins
Prep Time
30 mins
Prep Time
30 mins
Prep Time
30 mins


Comments