
Happy 250th Birthday, America!
- Carol Ann Kates

- 1 day ago
- 10 min read

America’s 250th Birthday is just around the corner. In this blog, I share my favorite backyard recipes: Blue-Cheese Stuffed Hamburgers (also known as Fourth of July Hamburgers), Grilled Artichoke Hearts with a Remoulade Sauce, Mexican Street Corn, Pauline’s Potato Salad, Watermelon Granita, which can be serves as a dessert or add an adult beverage for a delicious cocktail, and my Red, White, and Blue Parfait’s, which can be served in either wine glasses or mason jars, adding a festive flair to your celebration. So, however you choose to celebrate, I hope these recipes add some sizzle to your Fourth of July.
Blue-Cheese Stuffed Hamburgers (aka Fourth of July Hamburgers)
Makes 4 Patties
If you are not a fan of blue cheese, you can substitute feta cheese.
2 pounds ground sirloin steak (or any lean ground beef)
3 tablespoons fresh snipped chives
3 fresh basil leaves, chopped
½ teaspoon crushed red pepper flakes
¼ teaspoon salt
½ teaspoon large grind black pepper
4 tablespoons crumbled blue cheese
Preheat the grill to a high heat. In a large bowl, gently mix ground sirloin steak, chives, basil, red pepper flakes, salt, and pepper. Shape beef mixture into 4 thick patties. Make a pocket in the center of each patty, fill with blue cheese, and cover cheese with meat so that the burger is stuffed with cheese. Grill patties over a high heat, about 5 minutes per side for medium rare.
Serve with:
Sesame seed buns
Sliced tomatoes
Thinly sliced red onions
Arugula, spinach, or your favorite lettuce
Your favorite pickles
Mayonnaise
Ketchup
Mustard
(If you are a true blue-cheese lover, sprinkle with additional cheese.)
Cooking tip: To make the pockets: Form the ground beef into thick patties. Use a steak knife and begin ¼ inch from one edge. Slice down into patty about ¼ inch then continue to cut across patty to the other side, stopping about ¼ inch from edge. The top should resemble a flap.
Cooking tip: Use a meat thermometer to test for doneness. Hamburgers should be cooked to an internal temperature of 160 degrees F.
Storage tip: It is best not to keep fresh ground beef in your refrigerator for more than 1 or 2 days. If you can’t use it within this time frame, freeze it. When exposed to oxygen, ground beef will become a rosy-red color. Sometimes you may find the center of a package of ground beef has darkened. This is not harmful. This is the result of lack of exposure to oxygen. If you have concerns about ground beef, check the smell. It should be fresh, not sour, and the meat should feel moist not slimy.

Grilled Artichokes with a Remoulade Sauce
Serves 8
For the Remoulade:
2 cups mayonnaise
4 tablespoons sweet pickle relish
2 garlic cloves, minced
2 teaspoons capers
1 teaspoon Dijon mustard
1 tablespoon lemon juice
½ teaspoon Worcestershire® sauce
Salt to taste
Freshly ground black pepper to taste
In a small bowl, combine mayonnaise, pickle relish, garlic, capers, mustard, lemon juice, and Worcestershire® sauce. Season to taste with salt and pepper. Cover with plastic wrap and chill for 2 hours prior to serving.
For the artichokes:
4 large artichoke
4 lemons
2 tablespoons extra virgin olive oil
2 teaspoons garlic, minced
Place artichokes on a cutting board. Using a sharp knife, cut off the stem so that artichokes will stand upright and slice 1 inch off its top if using large artichokes, ½ inch if using small. Remove any tough outer leaves around the stem. Using cooking shears, snip off the sharp tips of the leaves. Hold artichokes upright and place under a solid stream of running water to wash out any debris.
Cut artichokes in half lengthwise. The inside of an artichoke has three parts—the stem, the heart, and the hairy choke. Using a spoon or a small paring knife, remove the hairy choke. It is not edible. Immediately squeeze lemon juice on the inside of chokes to prevent browning. Place chokes in a large bowl of lemon water until ready to boil.
8 prepped artichoke halves
Lemon halves used for browning prevention
2 tablespoons extra virgin olive oil
2 teaspoons minced garlic
Fill a large kettle with water, lemons halves used to prevent browning, olive oil, and garlic and place over a high heat. Bring water to a solid rolling boil, add artichokes, and cook 15 to 20 minutes, depending upon size. Artichokes are done when a fork can be easily inserted into the base and the outside leaves pull out easily.
For grilling:
Juice of 1 lemon
1 ½ cups extra virgin olive oil
8 garlic cloves, minced
2 teaspoons salt
1 teaspoon freshly ground black pepper
In a small bowl combine lemon juice, olive oil, garlic, salt, and pepper. Preheat the grill to high heat. Brush artichokes with the olive oil mixture. Grill artichokes for 5 to 10 minutes, or until grill marks reach the desired appearance, turning frequently and brushing with the olive oil mixture.
Serve immediately with remoulade on the side.
Tips on shopping for artichokes: A good artichoke will have tightly packed, crisp leaves. As artichokes age, their leaves spread apart. Look on the cut end. A black end means the artichoke has been stored too long. Do not buy this vegetable if it is wilted, dried out, or moldy. Fall and winter artichokes may have bronze tips or a whitish, blistered appearance. This is caused by exposure to a light frost. Some artichoke connoisseurs believe this vegetable is more tender and intensely flavored after a frost.
Tips on storing artichokes: If placed in plastic bags and refrigerated, an artichoke will keep up to 1 week.

This dish is really messy. Don’t cut the bottom stalk off the cob. Keep it on and use it as a handle. If your supermarket is out of cotija cheese, substitute queso.
Mexican Street Corn
Serves 4
4 ears corn
Cooking spray for coating corn
½ cup cotija or queso cheese, finely crumbled, plus more for serving
¼ cup mayonnaise
¼ cup Mexican crema
¼ of a jalapeño, seeded and minced
¼ cup chopped cilantro, plus more for serving
1 teaspoon minced garlic
½ teaspoon chipotle chile powder, plus more for serving
½ teaspoon salt
2 teaspoons lime zest
2 teaspoons lime juice
Preheat the grill to a high heat.
Remove husks from corn and rinse cobs under cold water, removing silks. Don’t cut the bottom stalk off the cob. Keep it on and use it as a handle. Lightly spray each cob with cooking spray.
In a medium bowl, place cheese, mayonnaise, Mexican crema, jalapeño, cilantro, garlic, chipotle chile powder, salt, and lime juice and zest and stir to combine.
Place corn on the grill and grill for about 12 minutes, turning cobs ¼ turn every 3 minutes.
Using a pastry brush, top each corn cob with the cheese mixture. Sprinkle with additional cheese, cilantro, and chipotle chile powder to taste.
Tips on shopping for corn: Examine the husks first. Husks should be bright green and fit snugly. My father taught me to pull back enough of the husk to expose the kernels. To judge the quality of corn by its kernels, look for evenly spaced rows that are plump and milky all the way to the ear. The silks should be dry and deep gold in color. Avoid corn with soggy silks. Occasionally, you will find your supermarket sells corn packed in trays. Examine these ears carefully as they may be old. Corn with flattened, tightly packed kernels will be starchy.
Tips on storing corn: Place the ears in plastic or reusable bags before refrigerating. They will keep 1 to 2 days.
Tips on prolonging the life of cilantro: To help prolong the life of some herbs, like cilantro, place them in a glass of water, stems down, cover with a plastic bag, secure the bag with a rubber band, and refrigerate. Change the water every 2 days.
Tips on juicing limes: If you don’t have a lime juicer, cut the lime in half, hold the lime over a small bowl, and rotate a fork in the pulp, releasing juice.
Pauline’s Potato Salad

Pauline’s Potato Salad
Serves 8
This is my mother’s recipe for the perfect picnic potato salad. Her mother, Glady, passed it down to her, and she, in turn, shared it with me. My family thinks it is the best ever. Don’t forget to buy celery seed. Grandma Gladys claims it is the secret ingredient.
6 medium potatoes, peeled and quartered
8 hard-boiled eggs, cubed into ¼-inch pieces (You can use an egg slicer.)
6 green onions, thinly sliced
1 cup mayonnaise
1 tablespoon Dijon mustard
¾ cup pickle relish (We like Famous Dave’s® Sweet ‘n Spicy Pickle Relish.)
1 ½ teaspoons salt
¾ teaspoon large grind black pepper
1 ½ teaspoons celery seed
In a large saucepan, place potatoes with just enough water to cover. Bring to a boil over a medium-high heat. Reduce the heat and simmer gently until pieces are tender yet remain firm when pierced with a fork, about 20 to 25 minutes. Drain, cool, and cut into bite-size pieces.
In a large bowl, combine potatoes, eggs, and green onions. In a separate bowl, combine mayonnaise, Dijon mustard, pickle relish, salt, pepper, and celery seed. Blending the spices into the mayonnaise mixture provides an even distribution of the seasonings. Fold the mayonnaise mixture into the potato mixture and mix gently. Chill for at least 4 hours, but best when chilled overnight.
Cooking tip: The secret to making great potato salad is not overcooking or undercooking the potatoes. When preparing potatoes for boiling, keep portions as similar in size as possible. I prefer to quarter the potatoes. If quartered, boil between 20 to 25 minutes. Potatoes are done when they are tender yet remain firm when pierced with a fork. Soft, soggy potatoes make a mushy salad. Cool potatoes completely before proceeding.

If you want to serve your granita as a cocktail, add ½ cup of vodka, rum, or tequila but reduce the liquid in the recipe by ½ cup. Garnish it with watermelon slices, lime wedges, or dip chilled glasses into a spice mixture.
Watermelon Granita
Serves 4
1 cup water
1 cup sugar
2 teaspoons fresh grated lime peel
3 pounds unpeeled seedless watermelon, cut into 2-inch cubes
1 teaspoon fresh lime juice
In a medium saucepan, place water, sugar, and lime peel over a high heat. Bring to a boil, stirring until sugar is dissolved. Boil 1 minute. Remove from the heat and let cool.
In a blender or food processor, process watermelon until it is liquefied. Add 1 cup of the sugar syrup and process again until combined. Strain syrup through a fine sieve or wire strainer into a medium bowl, removing any seeds. Add lime juice and stir to combine. Season to taste with any remaining sugar syrup or lime juice.
Pour watermelon purée into an 8-inch square baking dish. Cover with plastic wrap and freeze until the mixture has started to freeze at the edges but is still slushy, about 2 to 3 hours. Stir the mixture thoroughly, scraping down the sides. Cover again with plastic wrap and freeze until the mixture is solid, about 8 hours, best if frozen overnight.
To serve: Scrape the granita with a fork, making large flakes, and spoon into chilled glasses.
Tips on shopping for watermelons: My father taught me to thump a watermelon with my knuckle. If it sounds hollow, it’s ripe. Characteristics to look for are a symmetrical, dull-colored body, and a slightly flat, yellowish, almost butter-colored underbelly. If the underbelly is white, the watermelon will likely be underripe. If it is bright yellow, it will be overripe. It should not have flat sides.
Tips on storing watermelons: Melons should be stored at room temperature until fully ripe. Once the fruit has matured, it can be stored in the refrigerator for up to 5 days. Once you cut your melon, it should be placed in an airtight container or wrapped tightly with plastic wrap, as it can absorb odors from other foods. Cut melon will keep 3 days in the refrigerator.

If you don’t have the time or inclination to make a flag cake, sizzle up your Fourth of July barbecue with my Red, White, and Blue Parfaits. They are delicious, easy to make, and just as festive.
One serving includes two 1-inch thick slices of angel food cake, 1 cup of halved or quartered strawberries, and ½ cup blueberries. Add whipped cream or Cool Whip® to taste. You don’t have to be too fussy about the layers. The red, white, and blue colors will make their own patriotic statement.
The following recipe serves 4. If you are having a large crowd, this recipe is easy to double, triple, or quadruple. You can make an angel food cake from scratch or buy one at the supermarket. One store-bought angel food cake will make 8 to 10 parfaits.
Serve Red, White, and Blue Parfaits in wine glasses or Mason jars.
Fourth of July Red, White, and Blue Parfaits
Serves 4
1 container (8 ounces) heavy whipping cream
or
1 container (8 ounces) Cool Whip® topping
1 teaspoon vanilla extract
1 to 2 tablespoons Confectioners’ sugar, or to taste
4 cups strawberries, washed, hulled, and cut in halves or quarters, depending on size of berry
2 cups fresh blueberries
8 slices (1-inch thick) Angel Food cake, cut into 1-inch squares
Strawberry slices and blueberries for garnish
To whip the heavy cream: Place the attachments to your mixer in the freezer for 15 minutes. Make sure the heavy cream is cold.
Place heavy whipping cream in a large bowl. On a medium-high speed, whip cream until soft peaks form. Add vanilla and Confectioners’ sugar and whip until semi-sturdy peaks form. Peaks will droop slightly when the mixing attachments are lifted out of the cream but should not lose their shape.
In 4 Mason jars or wine glasses, place cake squares from 1 slice angel food cake. Layer with ½ cup strawberries and ¼ cup blueberries. Top with whipped cream. Repeat with a layer of Angel Food cake squares, ½ cup strawberries, ¼ cup blueberries, and top with whipped cream.
Garnish with sliced strawberries and a few blueberries.
Cover with plastic wrap and refrigerate for at least 1 hour.
Tips for selecting blueberries: Look for deep, purple-blue to blue-black berries with a slight silver frost. Blueberries should be plump and free of moisture. The best indicator of maturity is color. Reddish berries are not ripe and, therefore, not as palatable; but they can still be used in cooking. Avoid green, dull, lifeless, or mushy berries. Always check for mold, especially on the bottom of the container.
Tips for storing blueberries: Blueberries are the least fragile berry and can be stored in the refrigerator for 5 to 6 days. For best results, keep the berries dry during storage.
Tips for selecting strawberries: Strawberries should be plump with a bright red color. Their caps should be green and look fresh. Avoid fruit with limp or spoiled caps. The size of a strawberry is not an indication of flavor. Small or large strawberries can be sweet and juicy. Do not buy strawberries with white or green splotches or mold. Moisture speeds decay so don’t buy fruit with excess moisture. Always check the quality of the fruit from the bottom of the container as well.
Tips for storing strawberries: When you bring this fruit home, it is a good idea to pick through the strawberries and discard any bruised or damaged berries. Cover and refrigerate the strawberries by placing them in a reusable, paper, or plastic bag or by lightly wrapping them in plastic. Do not wash them until just before eating.
Carol Ann

Carol Ann Kates is the award-winning author of cookbook, Secret Recipes from the Corner Market, and international Amazon best-selling and award-winning author of Grocery Shopping Secrets. She’s an expert in how to shop, select, and store produce for maximizing home cooking outcomes and minimizing time and money spent. As a former supermarket and deli operator, Carol Ann shares grocery-insider wisdom—the same expertise you used to receive when patronizing a mom-and-pop establishment. Contact her at CarolAnn@CarolAnnKates.com and explore her website, www.CarolAnnKates.com.
1
Searing the Beef
Sear beef fillets on high heat for 2 minutes per side to form a golden crust. Let it cool before proceeding to keep the beef tender.
1
Searing the Beef
Sear beef fillets on high heat for 2 minutes per side to form a golden crust. Let it cool before proceeding to keep the beef tender.
1
Searing the Beef
Sear beef fillets on high heat for 2 minutes per side to form a golden crust. Let it cool before proceeding to keep the beef tender.
1
Searing the Beef
Sear beef fillets on high heat for 2 minutes per side to form a golden crust. Let it cool before proceeding to keep the beef tender.
Notes


1
Season the good fresh beef fillets with salt and black pepper. Heat olive oil in a pan over high heat and sear the fillets for 2 minutes per side until it fully browned. Remove the beef from the pan and brush with a thin layer of mustard. Let it cool.
1
Season the good fresh beef fillets with salt and black pepper. Heat olive oil in a pan over high heat and sear the fillets for 2 minutes per side until it fully browned. Remove the beef from the pan and brush with a thin layer of mustard. Let it cool.
1
Season the good fresh beef fillets with salt and black pepper. Heat olive oil in a pan over high heat and sear the fillets for 2 minutes per side until it fully browned. Remove the beef from the pan and brush with a thin layer of mustard. Let it cool.
1
Season the good fresh beef fillets with salt and black pepper. Heat olive oil in a pan over high heat and sear the fillets for 2 minutes per side until it fully browned. Remove the beef from the pan and brush with a thin layer of mustard. Let it cool.
Instructions
Quality Fresh 2 beef fillets ( approximately 14 ounces each )
Quality Fresh 2 beef fillets ( approximately 14 ounces each )
Quality Fresh 2 beef fillets ( approximately 14 ounces each )
Beef Wellington
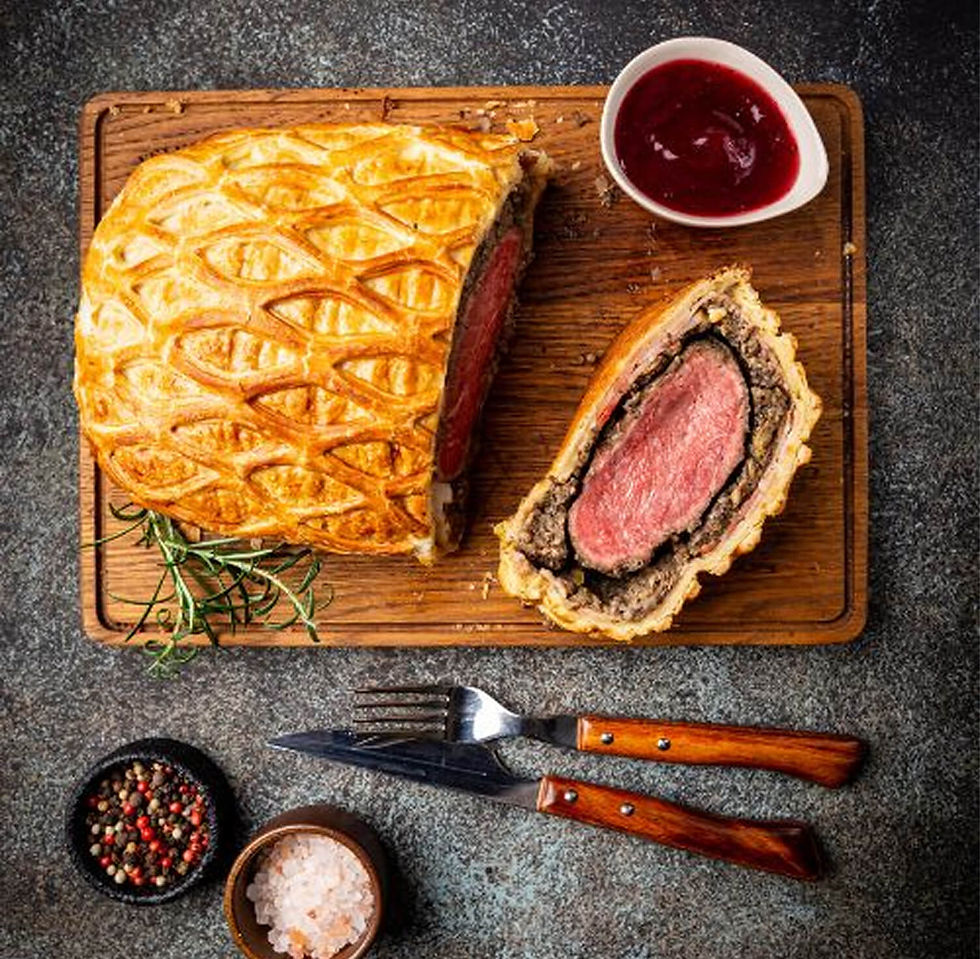
Beef Wellington
Fusion Wizard - Rooftop Eatery in Tokyo
Author Name
%20(1).jpg)
Beef Wellington is a luxurious dish featuring tender beef fillet coated with a flavorful mushroom duxelles and wrapped in a golden, flaky puff pastry. Perfect for special occasions, this recipe combines rich flavors and impressive presentation, making it the ultimate centerpiece for any celebration.
Servings :
4 Servings
Calories:
813 calories / Serve
Prep Time
30 mins
Prep Time
30 mins
Prep Time
30 mins
Prep Time
30 mins


Comments