
Beer Cheese Soup – Perfect for a Simple Winter Supper
- Carol Ann Kates

- Jan 22
- 4 min read

One of my best friends died in 2024, and I still miss her very much. I used to meet her for lunch or dinner at either Austin’s on Harmony or the Moot House, and she would often order coconut shrimp and beer cheese soup. I did a recipe for Coconut Shrimp in honor of Nancy several months ago and wanted to also remember her by sharing my beer cheese soup recipe. I must admit I think my recipe is more delicious than either of the above restaurants.
Following is my rendition of and thoughts on making beer cheese soup.
Darker beers like stouts and IPAS will have a more bitter flavor and will pass this bitterness along to the soup. I like using German pilsners or lagers when I make beer cheese soup. Local American beers like Fat Tire, Sam Adams, or Budweiser also work nicely. No matter what kind of beer you use, pour it in slowly when you add it.
We don’t want to use pre-shredded cheese in this recipe. Pre-shredded cheeses contain an anti-caking agent that affects how cheese melts. It is worth the extra effort to shred the cheese yourself.
I like having chunks of veggies in my beer cheese soup. Aren’t we all trying to eat more veggies? Why remove them? If you want a smoother soup, you can pour the soup through a sieve removing any veggies or purée the soup in a food processor or blender.
It is also important not to let this soup boil as this can cause the cheese to separate or curdle. I like adding a jalapeño to my beer cheese soup as it adds a bit of heat, but you can eliminate the jalapeño if you like a milder flavor.
Cheers to Beer Cheese Soup and Nancy Hansford
Makes 6 Servings
Serve with pretzels.
½ pound bacon, (about 6 slices) sliced into ½ inch pieces
1 celery rib, diced
1 small onion, diced (about 1 cup)
1 carrot, peeled and diced
1 jalapeño, seeded and diced
3 teaspoons minced garlic
1 tablespoon fresh thyme leaves
1 bottle (12-ounces) German beer, divided
2 cups chicken broth, or more if needed to achieve desired consistency
4 tablespoons butter
¼ cup all-purpose flour
4 ounces cream cheese
8 ounces sharp yellow Cheddar cheese, shredded
4 ounces smoked Cheddar cheese, shredded
1 cup heavy cream
1 teaspoon Dijon mustard
Reserved bacon
½ teaspoon salt
½ teaspoon large grind black pepper
In a large kettle, place bacon over a medium heat and sauté until bacon is crisp, about 7 to 8 minutes. Using a slotted spoon, transfer bacon to a plate lined with paper towels to drain.
Drain bacon drippings, reserving 2 tablespoons in the kettle. Add celery, onion, carrot, jalapeño, garlic, and thyme to the kettle and sauté until veggies are tender, about 8 minutes. Add half the bottle of beer and cook until liquid is reduced by half, about 5 minutes. Add chicken broth, reduce the heat to low, and bring to a simmer.
In a small skillet, melt butter over a medium heat. Add flour and stir continuously until thick and smooth.
Whisk the butter/flour mixture into the veggie mixture and simmer for about 8 minutes, until thick.
Add cream cheese, sharp yellow and smoked cheddar cheeses, heavy cream, mustard, and remaining beer and whisk occasionally, until soup is thick and creamy, about 5 minutes. Continue whisking until the cream cheese has fully incorporated.
Add reserved bacon and season to taste with salt and pepper. Continue simmering until bacon is warmed through. Serve warm.
Tips on storing semi-soft to semi-hard cheeses: Semi-soft to semi-hard cheeses like Gruyère, Havarti, Muenster, Gouda, Edam, and Jarlsberg contain more moisture than hard cheeses, so they won’t keep as long. If they are stored properly, you may be able to extend the shelf life 2 to 4 weeks past the “Sell-By” date. Wrap semi-soft and semi-hard cheese in parchment paper and then place in a reusable food storage bag or in a Ziploc® bag. If you think the cheese has gone bad, use your sense of smell and taste. It should not smell putrid and should taste like it did when you brought it home. You can cut mold off semi-soft and semi-hard cheeses, but if the mold looks unusual, it is best to toss the cheese out.
Tips on freezing cheese: If you are pinching pennies and your supermarket has cheese on sale, some types of cheese can be frozen. Do not freeze hard cheeses like Parmesan Reggiano. If properly stored, hard cheese will keep 4 to 6 months in the refrigerator. Do not freeze soft cheeses, soft-ripened cheeses, or hand-crafted cheeses. Although its taste won’t change, the texture of cheese will change when it is frozen. Frozen cheese will yield the best results if, when thawed, you grate it, melt it, or crumble it.
The best cheeses to freeze are blocks of semi-hard cheeses like Cheddar, Monterey Jack, Colby Jack, mozzarella, or provolone. Freeze cheese in its original packaging if unopened and place it in a reusable or a Ziploc® freezer bag. Press as much air out of the bag as possible before freezing. If opened, wrap the cheese tightly with plastic wrap or aluminum foil and then place it in a reusable or a Ziploc® freezer bag. Press as much air out of the bag as possible before freezing. You can freeze packaged shredded cheese. Again, press as much air out of the bag as possible before freezing. If you shred the cheese yourself, place it in a reusable or a Ziploc® freezer bag and press as much air out of the bag as possible before freezing. Frozen shredded cheese should be used within 2 months.
Carol Ann

Carol Ann Kates is the award-winning author of cookbook, Secret Recipes from the Corner Market, and international Amazon best-selling and award-winning author of Grocery Shopping Secrets. She’s an expert in how to shop, select, and store produce for maximizing home cooking outcomes and minimizing time and money spent. As a former supermarket and deli operator, Carol Ann shares grocery-insider wisdom—the same expertise you used to receive when patronizing a mom-and-pop establishment. Contact her at CarolAnn@CarolAnnKates.com and explore her website, www.CarolAnnKates.com.
Copyright 2026 All Rights Reserved Carol Ann Kates
1
Searing the Beef
Sear beef fillets on high heat for 2 minutes per side to form a golden crust. Let it cool before proceeding to keep the beef tender.
1
Searing the Beef
Sear beef fillets on high heat for 2 minutes per side to form a golden crust. Let it cool before proceeding to keep the beef tender.
1
Searing the Beef
Sear beef fillets on high heat for 2 minutes per side to form a golden crust. Let it cool before proceeding to keep the beef tender.
1
Searing the Beef
Sear beef fillets on high heat for 2 minutes per side to form a golden crust. Let it cool before proceeding to keep the beef tender.
Notes


1
Season the good fresh beef fillets with salt and black pepper. Heat olive oil in a pan over high heat and sear the fillets for 2 minutes per side until it fully browned. Remove the beef from the pan and brush with a thin layer of mustard. Let it cool.
1
Season the good fresh beef fillets with salt and black pepper. Heat olive oil in a pan over high heat and sear the fillets for 2 minutes per side until it fully browned. Remove the beef from the pan and brush with a thin layer of mustard. Let it cool.
1
Season the good fresh beef fillets with salt and black pepper. Heat olive oil in a pan over high heat and sear the fillets for 2 minutes per side until it fully browned. Remove the beef from the pan and brush with a thin layer of mustard. Let it cool.
1
Season the good fresh beef fillets with salt and black pepper. Heat olive oil in a pan over high heat and sear the fillets for 2 minutes per side until it fully browned. Remove the beef from the pan and brush with a thin layer of mustard. Let it cool.
Instructions
Quality Fresh 2 beef fillets ( approximately 14 ounces each )
Quality Fresh 2 beef fillets ( approximately 14 ounces each )
Quality Fresh 2 beef fillets ( approximately 14 ounces each )
Beef Wellington
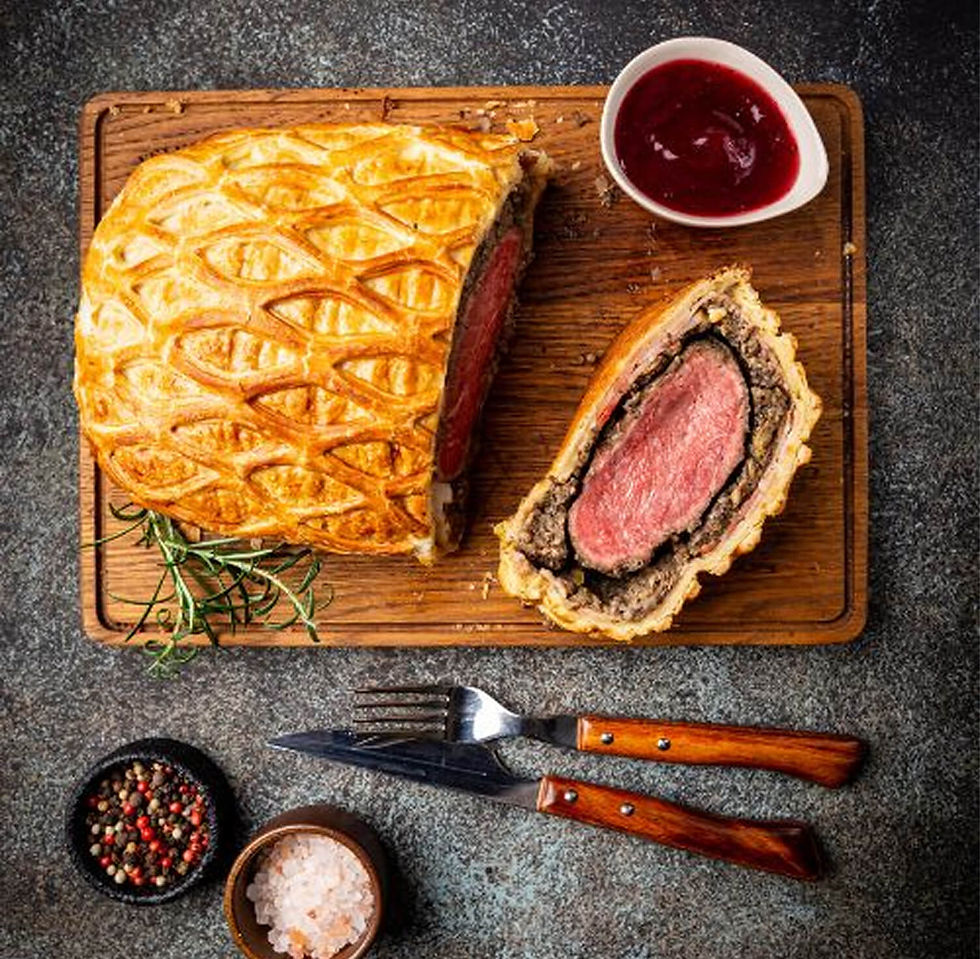
Beef Wellington
Fusion Wizard - Rooftop Eatery in Tokyo
Author Name
%20(1).jpg)
Beef Wellington is a luxurious dish featuring tender beef fillet coated with a flavorful mushroom duxelles and wrapped in a golden, flaky puff pastry. Perfect for special occasions, this recipe combines rich flavors and impressive presentation, making it the ultimate centerpiece for any celebration.
Servings :
4 Servings
Calories:
813 calories / Serve
Prep Time
30 mins
Prep Time
30 mins
Prep Time
30 mins
Prep Time
30 mins


Comments